Running simple CoreDNS setup
When playing around with IT infra I find myself creating and deleting Virtual Machines quite often. I quickly discovered updating hosts files is probably nobody's favourite part. So I decided to run a simple DNS server and preferably one that is lightweight. Not only because I am currently running a very minimal setup with limited resource (just my laptop) but also because CoreDNS is listed in CNCF which makes it more attractive to give it a try. For my small setup I'm fine for now with my router functioning as DHCP. Next to not having to update hosts files, mostly, obvious benefits are not having to use IP addresses anymore and all it takes is updating the DNS configuration and pointing new Virtual Machines to this custom DNS where the configuration of resolving IP addresses to domain names happens.
For the most of what I needed to learn on how CoreDNS in a very basic need-to-know setup works, I learned from this blogpost which explains it well enough for me to make it work: blogpost
Some things were slightly different for me. I'm running Ubuntu Server 20.04 to start with. And I've used the Docker documentation to get the requisite Docker installed correctly: install docker on ubuntu
With that out of the way I first pulled in the image with docker pull coredns/coredns and next I stopped and disable the service systemd-resolve that occupies port 53 preventing me from running the image on this port and because we are replacing this by our own DNS server.
Execute systemctl stop systemd-resolved and if you plan to keep CoreDNS systemctl disable systemd-resolved
I placed the files to configure CoreDNS on the Virtual Machine in /data/coredns/, so the command to run the container is:
docker run -d --name coredns --volume=/data/coredns/:/root/ -p 53:53/udp coredns/coredns -conf /root/Corefile
Now to see if the container is running successfully execute docker ps but if the container image is not displayed try docker ps -a in order to also show stopped / crashed containers. If the image show up with a status exited try docker logs coredns to get get the stderr output which should show you an error hinting on any issue that might occur that you should trouble shoot.
Looking more closely at the files I used to configure the DNS, like I mentioned above, I got the from this blogpost and if you want to read more on what the content means I recommend reading it too. My folder /core/dns/ contains just 3 files listed blow with content:
/data/coredns/Corefile
.:53 {
forward . 8.8.8.8 9.9.9.9
log
errors
}
lab.codevieillard.tech:53 {
file /root/db.lab.codevieillard.tech
log
errors
}
192.168.1.0/24:53 {
file /root/db.192.168.1
log
errors
}
/data/coredns/db.lab.codevieillard.tech
$ORIGIN lab.codevieillard.tech.
@ 3600 IN SOA harbor.lab.codevieillard.tech. mail.lab.codevieillard.tech (
2017042745
7200
3600
1209600
3600
)
3600 IN NS a.iana-servers.net.
3600 IN NS b.iana-servers.net.
harbor IN A 192.168.1.32
/data.coredns/db.192.168.1
$TTL 604800
@ IN SOA harbor.lab.codevieillard.tech. mail.lab.codevieillard.tech. (
2
604800
86400
2419200
604800
)
IN NS harbor.lab.codevieillard.tech.
32. IN PTR harbor.lab.codevieillard.tech.
This was enough for my initial test setup where I needed to resolve a single domain (harbor.lab.local) to it's accompanying IP. All other (internet facing) queries are forwarded to Googles DNS. It happens to be that Harbor is running on the same Virtual Machine as CoreDNS but just on a different port. Now to make sure the CoreDNS will come up when rebooting the Virtual Machine I ran docker update --restart unless-stopped coredns to update the restart policy for this running container.
Whenever a new Virtual Machines arises in you lab you can easily extend the configuration files like this:
/data/coredns/db.lab.local append file with a new line: shiny-new-vm IN A 192.168.1.33
/data.coredns/db.192.168.1 append file with a new line: 33. IN PTR shiny-new-vm.lab.codevieillard.tech.
And then stop the container docker stop coredns docker stop coredns and remove it to make sure the config gets read in again by docker rm coredns
In this example I'll take an Ubuntu Server 20.04 as the shiny new virtual machine show what I did to make it point to my custom DNS. Nowadays Ubuntu comes with netplan which lets you configure your network settings in yaml. It's pretty straight forward by doing sudo vi /etc/netplan/00-installer-config.yaml and in my case using DHCP with a custom DNS the yaml looks like:
network:
ethernets:
ens33:
dhcp4: true
dhcp4-overrides:
use-dns: false
nameservers:
addresses: [192.168.1.32]
version: 2
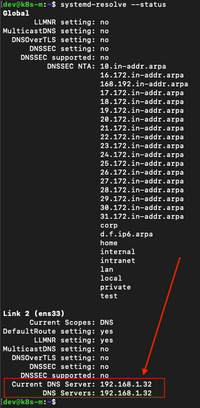
Next I execute sudo netplan --debug apply to read the configuration. And then systemd-resolve --status to verify the correct DNS is used. It should look somewhat like below:
When trouble shooting you can find out if you can reach the server and what the answer is with this command dig @192.168.1.32 harbor.lab.codevieillard.tech sudo or try systemctl restart systemd-networkd and eventually a reboot might help.
On the DNS side it should log a line which you should see running docker logs coredns like the following:
[INFO] 192.168.1.29:50071 - 7983 "A IN harbor.lab.codevieillard.tech. udp 70 false 4096" NOERROR qr,aa,rd 200 0.000151394s
To finish my simple setup, I'm pointing my laptops DNS to this server, then when I have lab time I can access my systems via domain names, Yay!
